Plastic Wings
Avro CF-100 Mk V Canuck
11th & 349th Sqn BAF
Belgium 1959
Klik de miniaturen voor een grotere afbeelding.

Absoluut een van de slechtste bouwervaringen ooit. Om te beginnen kocht ik, nog jong en onwetend, de verkeerde versie: een Mk IV. Deze heeft kortere vleugels dan de Mk V welke slechts een paar jaar in de Belgische luchtmacht diende.
Omruilen was niet mogelijk, dus dan maar een tweede doos gekocht en meteen naar Hobbycraft geschreven om een stel vervangvleugels en staartvleugel - die ook een grotere spanwijdte heeft dan de Mk IV - te vragen.
Die lieve mensen waren zo sympathiek om me op een paar weken tijd de juiste vleugels te bezorgen. Let wel: we hebben het hier over de vroege jaren '80, lang voor het internet gemeengoed werd.
De dozen gingen meteen de kast in, ik zou ze later wel eens maken. En zo kwam het dat ik niet heb opgemerkt dat in één van de dozen de glazen onderdelen ontbraken. Dat kwam uiteindelijk aan het licht toen ik begin 2004 de bouwdozen ergens achteraan de kast terugvond.
Toen was het uiteraard te laat om een onderdeel aan te vragen: Hobbycraft bestond inmiddels niet meer. Het werd meteen mijn eerste poging tot vacform. De mal maken was niet zo'n probleem, ik had immers een goed origineel van de andere kit.
Het vormen van de nieuwe glazen onderdelen verliep daarentegen heel wat minder vlot. Het resultaat is dan ook niet echt iets waar prijzen mee worden gewonnen...
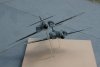
Enfin, dan maar aan de bouw begonnen. Het landingsgestel was waardeloos, zodat ik meteen al besliste de toestellen vliegend voor te stellen. De detaillering bestaat uit ingegraveerde lijnen, wat chic is voor zo'n oude kit. Alleen: 't zijn geen lijnen maar loopgraven! Dat is onmogelijk te corrigeren zonder alles op te vullen, te plamuren en te herschrijven - en daar had ik echt geen zin in. Cockpit detail is onbestaande in deze kit, maar daar valt gelukkig niets van te merken eens de piloten er in zitten en de kap gesloten is. Verder valt over de bouw op zich weinig te vertellen: de pasvorm is niet formidabel, en de manier waarop de romphelften ter hoogte van de motoren tegen elkaar moeten worden gepast zorgt er voor dat deze naad erg makkelijk breekt.
De decals in de kit waren dik, van een erbarmelijke kwaliteit, en er waren enkel Canadese markings voorzien. Maar goed, ik wou er toch een Belgische versie van maken. De makkelijkste oplossing was om zelf m'n decals te produceren. Er is echter zeer weinig info over dit toestel in Belgische dienst te vinden: behalve de boeken die ik op deze pagina vermeld, waren er op het internet nog een paar foto's te sprokkelen, en daarmee was de kous af. Zelfs in het Brussels Air Museum is er geen Belgische Canuck te vinden: alle overblijvende toestellen werden door de luchtmacht voor schroot verkocht, er schiet geen enkele meer over. In het museum staat er een Canadese Canuck Mk V, en dat is het. De 53 toestellen die de BLuM ooit had, waren niet aangekocht, maar in het kader van het MDAP voor 75% door de USA en voor 25% door Canada gefinancierd.
De Canuck werd gebruikt door het 11e smaldeel, wat een opleidingseenheid was, en in het 349e en het 350e waar de toestellen van 1958 tot 1964 operationeel als alle weer onderscheppingsjagers werden ingezet.
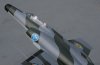
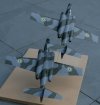
Het 11e bestond uiteindelijk maar twee jaar, van 1958 tot 1960. Als embleem gebruikten ze een vleermuis bovenop een gele driehoek. Daar vond ik ergens een afbeelding van die ik inscande en bijwerkte. Het 349e heeft als embleem twee gekruiste goedendags. Deze tekende ik met AutoCAD, aan de hand van een paar foto's. De serials, de staartvlag en de cocardes werden eveneens in AutoCAD getekend en alles werd met een laserprinter op transparante decalfilm geprint. De prints waren evenwel dermate transparant, dat ik ze op wit decalvel heb herprint. Dat gaf een veel beter resultaat, al werd het uitsnijden van de decals wel een secuur werkje.
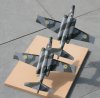
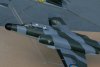
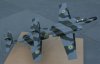
Het schilderen had weinig om het lijf: lichtgrijs onderaan, bovenaan middengrijs en donkergroen De exacte naam voor de kleuren ontgaat me, maar het zijn dezelfde kleuren als bij de Britse Vulcan.
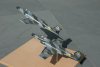
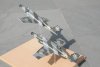
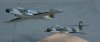
En daar zijn we. Twee Cluncks gemonteerd op een acrylstaaf. Om de acrylstaaf in het vliegtuig te bevestigen rolde ik een met witte lijm ingestreken reep papier rond de staaf. Nadat de papieren huls droog was, sneed ik ze op maat van de romp en plakte ze daar stevig in één romphelft voordat ik de romphelften samenbouwde. Op die manier had ik meteen een handige opening waarin ik een restje acrylstaaf als handvat kon insteken tijdens het airbrushen.
Heel het project was eigenlijk een teleurstelling, en ik had geen zin meer om een mooie bodemplaat te voorzien en om de gebruikelijke wheatering toe te passen. Ach, op de paar foto's die ik vond lijken alle toestellen vrij secuur onderhouden te zijn geweest en is wheatering wellicht overbodig.
Omruilen was niet mogelijk, dus dan maar een tweede doos gekocht en meteen naar Hobbycraft geschreven om een stel vervangvleugels en staartvleugel - die ook een grotere spanwijdte heeft dan de Mk IV - te vragen.
Die lieve mensen waren zo sympathiek om me op een paar weken tijd de juiste vleugels te bezorgen. Let wel: we hebben het hier over de vroege jaren '80, lang voor het internet gemeengoed werd.
De dozen gingen meteen de kast in, ik zou ze later wel eens maken. En zo kwam het dat ik niet heb opgemerkt dat in één van de dozen de glazen onderdelen ontbraken. Dat kwam uiteindelijk aan het licht toen ik begin 2004 de bouwdozen ergens achteraan de kast terugvond.
Toen was het uiteraard te laat om een onderdeel aan te vragen: Hobbycraft bestond inmiddels niet meer. Het werd meteen mijn eerste poging tot vacform. De mal maken was niet zo'n probleem, ik had immers een goed origineel van de andere kit.
Het vormen van de nieuwe glazen onderdelen verliep daarentegen heel wat minder vlot. Het resultaat is dan ook niet echt iets waar prijzen mee worden gewonnen...
Enfin, dan maar aan de bouw begonnen. Het landingsgestel was waardeloos, zodat ik meteen al besliste de toestellen vliegend voor te stellen. De detaillering bestaat uit ingegraveerde lijnen, wat chic is voor zo'n oude kit. Alleen: 't zijn geen lijnen maar loopgraven! Dat is onmogelijk te corrigeren zonder alles op te vullen, te plamuren en te herschrijven - en daar had ik echt geen zin in. Cockpit detail is onbestaande in deze kit, maar daar valt gelukkig niets van te merken eens de piloten er in zitten en de kap gesloten is. Verder valt over de bouw op zich weinig te vertellen: de pasvorm is niet formidabel, en de manier waarop de romphelften ter hoogte van de motoren tegen elkaar moeten worden gepast zorgt er voor dat deze naad erg makkelijk breekt.
De decals in de kit waren dik, van een erbarmelijke kwaliteit, en er waren enkel Canadese markings voorzien. Maar goed, ik wou er toch een Belgische versie van maken. De makkelijkste oplossing was om zelf m'n decals te produceren. Er is echter zeer weinig info over dit toestel in Belgische dienst te vinden: behalve de boeken die ik op deze pagina vermeld, waren er op het internet nog een paar foto's te sprokkelen, en daarmee was de kous af. Zelfs in het Brussels Air Museum is er geen Belgische Canuck te vinden: alle overblijvende toestellen werden door de luchtmacht voor schroot verkocht, er schiet geen enkele meer over. In het museum staat er een Canadese Canuck Mk V, en dat is het. De 53 toestellen die de BLuM ooit had, waren niet aangekocht, maar in het kader van het MDAP voor 75% door de USA en voor 25% door Canada gefinancierd.
De Canuck werd gebruikt door het 11e smaldeel, wat een opleidingseenheid was, en in het 349e en het 350e waar de toestellen van 1958 tot 1964 operationeel als alle weer onderscheppingsjagers werden ingezet.
Het 11e bestond uiteindelijk maar twee jaar, van 1958 tot 1960. Als embleem gebruikten ze een vleermuis bovenop een gele driehoek. Daar vond ik ergens een afbeelding van die ik inscande en bijwerkte. Het 349e heeft als embleem twee gekruiste goedendags. Deze tekende ik met AutoCAD, aan de hand van een paar foto's. De serials, de staartvlag en de cocardes werden eveneens in AutoCAD getekend en alles werd met een laserprinter op transparante decalfilm geprint. De prints waren evenwel dermate transparant, dat ik ze op wit decalvel heb herprint. Dat gaf een veel beter resultaat, al werd het uitsnijden van de decals wel een secuur werkje.
Het schilderen had weinig om het lijf: lichtgrijs onderaan, bovenaan middengrijs en donkergroen De exacte naam voor de kleuren ontgaat me, maar het zijn dezelfde kleuren als bij de Britse Vulcan.
En daar zijn we. Twee Cluncks gemonteerd op een acrylstaaf. Om de acrylstaaf in het vliegtuig te bevestigen rolde ik een met witte lijm ingestreken reep papier rond de staaf. Nadat de papieren huls droog was, sneed ik ze op maat van de romp en plakte ze daar stevig in één romphelft voordat ik de romphelften samenbouwde. Op die manier had ik meteen een handige opening waarin ik een restje acrylstaaf als handvat kon insteken tijdens het airbrushen.
Heel het project was eigenlijk een teleurstelling, en ik had geen zin meer om een mooie bodemplaat te voorzien en om de gebruikelijke wheatering toe te passen. Ach, op de paar foto's die ik vond lijken alle toestellen vrij secuur onderhouden te zijn geweest en is wheatering wellicht overbodig.
Absolutely one of the worst modelling experiences ever. For a start (being still young and ignorant) I bought the wrong version: a Mk IV. The Mk IV has shorter wings than the Mk V that served for only a few years in the Belgian Air Force.
A swap was not possible so I bought a second kit and wrote to Hobbycraft for a pair of replacement wings and tail plane. Incidentally the tail plane also has a bigger span on the Mk V.
The good people at Hobbycraft were kind enough to mail me the correct wings within a week or two. Mind you, we're talking early eighties here, long before the internet was available to the general public.
I shelved both kits straightaway, intending to build them somewhere in the future. And that's how I never noticed the absence of clear parts in one of the kits. When I re-discovered the kits in early 2004 I realized what predicament I was in. By then it was much too late to request the parts as Hobbycraft had ceased to exist by then. This made me try my hand at vacuforming for the first time. Making the mould proved not to be all that difficult as I had good originals in one kit.
Vacuforming the parts was quite another story and the result isn't likely to win any prizes...
Oh well, I'll live with it. Let's start building. The landing gear was worthless and I decided to build them both gear up, flying. Detailing consists of engraved lines, which is really nice for a kit of that era. The only trouble is that "lines" isn't really the correct word. Trenches would be more appropriate. That was impossible to correct without filling, sanding and scribing the lot. I didn't very much feel like doing that. Cockpit detail is non-existent in this kit. Fortunately that isn't noticeable once the pilots are in place and the hood is closed. Apart from all that there really isn't much to be said about the build as such. Fit isn't all that great and the way the fuselage halves are mated together in the engine area makes for a very fragile seam.
The kit decals were thick and of poor quality and only provided Canadian markings. Well, I wanted to do two Belgian versions anyway. The simplest solution was to make my own decals. there is, however precious little information available on this aircraft in Belgian service. Except for the books mentioned on this page, I managed to find some pics on the internet, and that was that! Even in the Brussels Air Museum there isn't a Belgian Canuck to be found. The Belgian Air Force sold all remaining airframes for scrap, not a single one was preserved. In the museum you'll find a Canadian Canuck Mk V and that's all. The 53 Canucks the BAF once had weren't bought by Belgium: they were paid for by the USA (75%) and Canada (25%) as part of the MDAP programme.
The Canuck served with the 11th Squadron which was a training unit, and in the 349th and 350th Sqn where the aircraft were used operationally in the role of all weather interceptors from 1958 to 1964.
The 11th existed only for two years, from 1958 to 1960 when it was disbanded. Unit markings were a flying bat superimposed on a yellow triangle. I managed to find an image of these markings somewhere and scanned and cleaned it up somewhat. The 349th unit markings are two crossed maces. I drew them using AutoCAD using photographs as a reference. Serials, roundels and flag were equally drawn in AutoCAD and everything was printed on clear decal stock using a laser printer. They turned out to be very transparent so I reprinted them on white decal sheet. The result was a whole lot better, but cutting out the decals proved to be quite a task.
Painting was a doddle: pale grey on the undersides, medium grey and dark green on the topside. I can't remember the precise name for the colours, but they're the same ones used on the British Vulcan.
So there we are. Two Cluncks on a stick. To attach the planes onto the acryl rods I wrapped a ribbon of paper coated in white glue around the rod. Once the glue had dried, I removed the rod. The paper tube was then fitted into one fuselage halves, trimmed to shape and glued securely into place before joining the fuselage halves. That way I had a convenient opening in which to put some scrap rod that would make a good handle while airbrushing the model.
The whole project was a bit of a disappointment really, and I didn't want to make a nice base or to apply the usual weathering. Oh well, in the few pictures I've found they all look like they've been taken good care of, so weathering would probably be superfluous.
Data
Kit: Hobbycraft HCC 1654, built straight out of the box, except for the decals.Glue: mainly Zap-A-Gap, both super thin and gap filling. White glue for the clear parts.
Putty, polishing compound and masking tape all from Tamiya.
Decals: custom made
Paint: Humbrol enamels 127 and matt white and Testors ModelMasters metalizers.
Sealing: Johnson's Future.
Airbrush: Badger 150
Wash: none
Weathering: none
Varnish: Revell Matt
Documentation: The aircraft of the Belgian Air Force by Paul Detiège, De luchtmacht (ed. Lannoo), the Belgian Air Force by John Pacco and the internet.
Steven De Mulder
