 |
 |
 |
 |
 |
||
 |
 |
 |
 |
 |
||
 |
 |
 |
 |
 |
|
|
|
|
|
||
|
|
|
|
|
||
|
|
|
|
|
Historiek (bron: Wikipedia)
Peace Xenia is een programma van de Griekse luchtmacht voor de aankoop van gevechtsvliegtuigen.
In 1987 werden onder Peace Xenia I 40 F-16C/D Block 30 besteld, die een jaar later geleverd werden. Daar kwamen in 1992 onder Peace Xenia II nog 40 Block 50 toestellen bij, in 2003 gevolgd door nog eens 50 stuks Block 52+ onder Peace Xenia III. Een jaar later werden er nog 10 zo'n vliegtuigen aangekocht. De verdeling was 40 F-16C en 20 F-16D, die tegen juni 2004 allemaal waren geleverd. Tegen 2009, onder Peace Xenia IV kwamen daar dan nog eens 20 F-16C en 10 F-16D Block 52M bij. |
History (source: Wikipedia)
Peace Xenia is a Greek air force aquisition program for the purchase of combat aircraft.
In 1987 40 F-16C/D Block 30 were ordered under Peace Xenia I, which were delivered a year later. In 1992 Peace Xenia II added another 40 Block 50 aircraft, followed in 2003 by yet another 50 Block 52+ under Peace Xenia III. A year later, an additional 10 planes were purchased. The breakdown was 40 F-16C and 20 F-16D, which were delivered by june 2004. By 2009, Peace Xenia IV saw the arrival of yet another 20 C models en 10 D models, all Block 52M. |
Bouwverslag
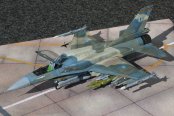
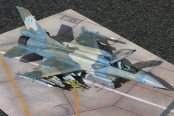
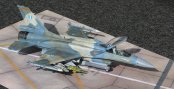
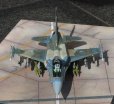
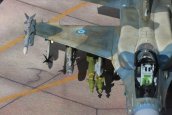
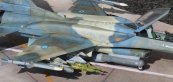
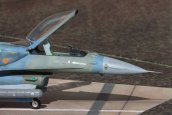
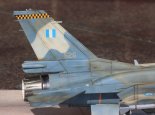
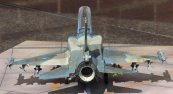
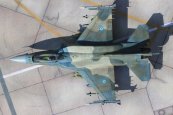
Ik wou al een tijdje zo een "ongewassen" Griekse F-16 met rugzakken en grijs/blauwe camouflage maken, en haalde dus de Kinetic kit K48028 in huis.
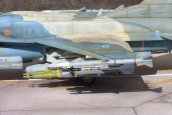
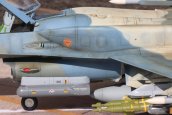
Stevige doos, tjokvol heerlijke plastic. Alles mooi gedetailleerd, en heel goed gedefinieerd. Héél veel onderdeeltjes, en ik bedoel ECHT heel veel. Sommige ervan zijn alternatieve onderdelen, welke in een andere boxing voor een andere versie nodig zijn. Ook genoeg wapens om drie of vier F-16's mee te bewapenen. Zouden ze daar bij Hasegawa niet eens een voorbeeld aan nemen? Helaas zijn er hier en daar wel wat putjes van de uitwerppinnen weg te werken. Sommigen zitten waar je ze nooit zal zien, maar anderen zijn zeer zichtbaar, of beletten de goede passing tussen twee elementen. De pasvorm is super, ik denk amper een paar kubieke millimeter (jawel!) nodig gehad te hebben. Mijn enige probleemgebied was het hoofdlandingsgestel, maar dat ligt misschien aan mij. Tussen die vele onderdelen zitten ook behoorlijk wat minuscule dingetjes bij, zoals antennes en probes. Vergrootbril en vaste hand zijn verplicht. Omdat het aantal onderdelen zo groot is, moet je echt goed het bouwplan (en de volgorde) in de gaten houden, zoniet vergeet je hier en daar misschien wel iets. Dat is op zich niet zo erg, daar je dat meestal achteraf nog recht kan zetten. Ik maakte de fout te denken dat ik de assemblage van inlaat en hoofdlandingsgestelkast beter later inbouwde dan wat het bouwplan in stap 3 aangaf, omdat ik dacht dat er dan geen naad zou ontstaan als ik het in stap 8 samen met het voorste deel van de luchtinlaat zou assembleren. Dikke fout, natuurlijk. Niettemin, mijn enige punt van kritiek is toch wel het bouwplan. Sommige onderdelen komen nergens in het bouwplan voor, terwijl ze wel moeten gebruikt worden. Van de bewapening zijn bepaalde wapens niet eens in het bouwplan opgenomen. En algemeen is het bouwplan hier en daar verwarrend, een kritiek die ik van een aantal medeleden van de plaatselijke IPMS-afdeling al had opgevangen. Schilderen en weatheren was een aangenaam werkje, vooral omdat het schema me erg aanspreekt. Goed vooruitdenken was een vereiste, want ik wou echt veel onder de vleugels en romp hangen, dus moesten de nodige pylons al voor het schilderen op hun plaats gelijmd worden. Op een lichtgrijze grondlaag kwam er preshading op de paneellijnen, gevolgd door het camouflagepatroon waarbij ik terug de "marmer" techniek gebruikte. Daarna nog wat blekere en donkerder tinten van de gebruikte camouflagekleuren toegevoegd om de zaken wat te verlevendigen, en alles verzegeld met drie lagen Future. O ja, dat FS35273 blauw moest ik zelf mengen, want Humbrol heeft niets dat er min of meer op lijkt. Ik gebruikte twee delen 128 en één deel 28. Vervolgens de decals er op, nog twee lagen Future, washes in verschillende kleuren olieverf, matte vernis, verdere weathering met een achttal kleuren pastelkrijtstof, en een laatste laag matte vernis om alles te verzegelen. Om te eindigen werden alle wapens, pods en brandstoftanks onder het vliegtuig gehangen, en de canopy en de laatste antennes toegevoegd. Er hangt niets onder dat een F-16 niet op de gebruikte pylon kan meenemen (denk ik toch), maar of hij met zo'n uitgebreide last nog van de grond raakt valt te bezien... |
Building the kits
For a long time I've been wanting to build one of these "unwashed" Greek F-16 in blue/grey camouflage, sporting backpacks, so I got myself a copy of the Kinetic kit K48028.
A sturdy box, filled to the brim with lovely plastic. Everything finely detailed and very well defined. Lots of parts, and I mean LOTS of them. Some of which are alternative parts, needed to build different versions found in other boxings. Also enough ordnance to load out three or four F-16s. Could the people at Hasagawa's take notice please? Unfortunately there are some ejector pin marks to deal with. Some are located where you'll never see them, but others are very visible or hinder the fit between parts. Fit in general is superb, and I can't have used more than a few cubic millimeters (that's right) of putty. The only area that gave me some difficulty was the main wheelbay, but that's probably of my own doing. Amongst these many parts there is quite some minute stuff, like antennae and probes. Magnifying glasses and a steady hand are mandatory. As the number of parts is so big, one really needs to adhere to the building instructions (and the sequence of things). Otherwise you might forget the odd bit here or there. Which in itself is not that such a big deal, as one usually can set things straight afterwards. I made the mistake to think it might be wiser to wait with adding the inlet/main gear bay assembly, and not put it in at step 3 as indicated in the instructions. I thought it better to do that in step 8, making it easier to avoid a nasty gap between said assembly and the front part of the intake. Big mistake, of course. Nonetheless, my only critcism is directed at the instructions. Some parts, though needed in the model, are not to be found on the instruction leaflet. Some of the weapons supplied arren't even mentioned in the instructions. And generaly speaking said instructions are a bit confusing here and there - a criticism I already heard from fellow members in the local IPMS branch. Painting and weathering was fun to do, predominantly because the paint scheme appealed to me very much. To think well ahead was key here, since I wanted to hang a lot from the wings and fuselage. All pylons required were to be glued in place before going to the paint shop. Starting with a pale grey base layer, I preshaded the panel lines, followed by the camouflage pattern where I used the marbling technique. After that, some paler and darker shades of the base colours, to liven things up a bit. Then, everything was sealed with three coats of Future. Ah, yes: I had to mix that blue FS35273 myself, as Humbrol doesn't have anything remotely similar. I used two parts 128 and one part 28. Next, the decals were added, followed by another two layers of Future. Washes in different colours of oil paint, matt varnish, further weathering using about eight colours of pastel chalk ground to a very fine powder, and a final layer of matt varnish to seal everything in. Finaly all ordnance, pods and fuel tanks were added, as well as the canopy and the final antennae. Though I've hanged nothing under my model that a real F-16 wouldn't be able to carry under the pylon used (or so I think), it remains to be seen whether it would be able to get airborne loaded like this... |
|
Gegevens: Lengte: 15.1 m Hoogte: 5.08 m Spanwijdte: 9.45 m Max. startgewicht: 19.200 kg Max. snelheid: Mach 2 Gevechtsradius: 546 km Plafond: 15.240 m |
Data: Length: 15.1 m Height: 5.08 m Span: 9.45 m Max. take-off weight: 19.200 kg Max. speed: Mach 2 Combat range: 546 km Ceiling: 15.240 m |
