Plastic Wings
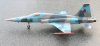
Northrop F-5E & F-5N
VF-43 Challengers - VFC-111 Sundowners
NAS Oceana 1991 - NAS Key West 2007
Klik de miniaturen voor een grotere afbeelding.

Beide kits kon ik op een modelbouwbeurs voor een zacht prijsje op de kop tikken: samen kostten ze me minder dan € 50. Het zijn oude kits, reeds meermaals door Hasegawa en Revell in verschillende uitvoeringen uitgebracht.
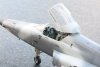
De kit heeft opliggende paneellijnen en een minimum aan flash. Pasvorm was perfect, behalve daar waar de motorinlaten op de onderzijde van de romp aansluiten.
Omdat het paneelwerk van de F-5 vrij eenvoudig is, besloot ik om alles netjes in te graveren - iets wat ik nog niet eerder probeerde. Snel naar m'n favoriete modelbouwzaak gefietst waar ik me een betaalbare krasser van Trumpeter en een vrij dure set sjablonen van Verlinden liet aansmeren. Die sjablonen zijn voorzien van een plastic rugvel dat behoorlijk kleeft. Voorzichtig losmaken dus, of je sjablonen zijn geplooid! Hoedanook, die sjablonen bleken vrij waardeloos te zijn op dubbelkromme oppervlakken: ze schuiven zò weg tijdens het graveren. Uiteindelijk bleek een oude bankkaart en wat dubbelzijdige plakband nog de beste oplossing - en 't kost zo goed als niets! Gebogen lijnen bleven een uitdaging, de bankkaart was hier van geen nut. De oplossing was om een speld in een boorhouder te klemmen, en dan meerdere keren zachtjes langs de opstaande lijnen te krassen tot wanneer de kras diep genoeg is. Een beetje prutswerk, toegegeven, maar met hier en daar eens herbeginnen en wat correcties met secondelijm was de klus toch in een uurtje of twaalf geklaard.
In de recensies welke je over deze kits kan vinden wordt steeds vermeld dat de panelen welke het bakboordskanon afdekken niet goed passen. Zelf had ik hiermee geen enkele moeite. De hele montage verliep zonder enig probleem, zodat ik al snel de kleurige camouflageschema's kon spuiten nadat ik eerst de paneellijnen met wat zwarte lijntjes van de verfspuit had geaccentueerd. Ik gebruikte voor de eerste maal Gunze verf en verdunner, wat zeer vlot werkt en mooie resultaten geeft. De verflaag is ook veel dunner dan wat je met Humbrol kan bereiken.
Niettemin vermoed ik dat men mij de verkeerde verdunner heeft aangeraden: na +/- twee weken begon de verf te craqueleren. Grrrr!!!
En zo zijn er twee kleurrijke toestellen met een ongewoon kleurenpatroon aan m'n verzameling toegevoegd. Alles verliep uiteindelijk vrij vlot, de bouwperiode liep van april tot augustus 2010.
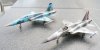
I was able to buy both kits at a modeller's convention at a bargain price: together they costed me less than € 50. These are old kits released time and again by both Hasegawa and Revell in various versions. The kit features raised panel lines and suffers from a minimum of flash.
Fit was perfect, except for where the intakes meet the lower fuselage.
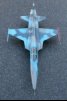
Since the panelling on the F-5 is fairly simple I decided to scribe the lot - something I've never attempted before. I hopped on my bike and paddled off to my favourite model shop where I got hold of a reasonably priced scriber (Trumpeter) and a rather expensive set of scribing templates (Verlinden). These templates come with a plastic backing sheet that adheres very well to the template. Peel off carefully, otherwise you end up with bent templates! Anyhow, these templates proved to be worthless for use on convex surfaces: they slide away just like that when scribing. Eventually an old bank card and some two-sided tape proved to be the best solution - and costing close to nothing to boot! Curved lines remained a challenge that couldn't be tackled with the bank card. The solution was a simple pin in a pinvise and to run it freehand along the raised panel line until a sufficient depth was reached. A bit tricky sometimes, I must admit, but a few corrections with superglue here and there and the odd redo I managed to get the job done in about twelve hours.
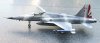
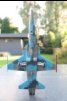
In almost every review of these kits one is warned about the bad fit of the panels covering the port gun. I had no trouble at all with them. The assembly went without a hitch, soon allowing me to spray the colourful camouflage schemes after first preshading the panel lines with black using the airbrush. I used Gunze paints and thinner for the first time, which went on very smoothly producing a very nice result. The layer of paint is also much thinner than what can be achieved with Humbrol paints.
Nevertheless I suspect that I've been advised to use the wrong thinner: after about two weeks the paint started to show cracks like old china. Grrrr!!!
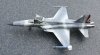
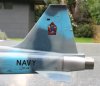
And thus I added two colurful machines in an unusual colour pattern to my collection. All went rather smooth, starting building in april and ending in august 2010.
Since the panelling on the F-5 is fairly simple I decided to scribe the lot - something I've never attempted before. I hopped on my bike and paddled off to my favourite model shop where I got hold of a reasonably priced scriber (Trumpeter) and a rather expensive set of scribing templates (Verlinden). These templates come with a plastic backing sheet that adheres very well to the template. Peel off carefully, otherwise you end up with bent templates! Anyhow, these templates proved to be worthless for use on convex surfaces: they slide away just like that when scribing. Eventually an old bank card and some two-sided tape proved to be the best solution - and costing close to nothing to boot! Curved lines remained a challenge that couldn't be tackled with the bank card. The solution was a simple pin in a pinvise and to run it freehand along the raised panel line until a sufficient depth was reached. A bit tricky sometimes, I must admit, but a few corrections with superglue here and there and the odd redo I managed to get the job done in about twelve hours.
In almost every review of these kits one is warned about the bad fit of the panels covering the port gun. I had no trouble at all with them. The assembly went without a hitch, soon allowing me to spray the colourful camouflage schemes after first preshading the panel lines with black using the airbrush. I used Gunze paints and thinner for the first time, which went on very smoothly producing a very nice result. The layer of paint is also much thinner than what can be achieved with Humbrol paints.
Nevertheless I suspect that I've been advised to use the wrong thinner: after about two weeks the paint started to show cracks like old china. Grrrr!!!
And thus I added two colurful machines in an unusual colour pattern to my collection. All went rather smooth, starting building in april and ending in august 2010.
Data
Kit: Hasegawa ST16 & 08182, completely rescribed, otherwise built straight out of the box.Glue: mainly Slater's Mek-Pak. White glue for the clear parts.
Putty, polishing compound and masking tape all from Tamiya.
Decals: from the kit
Paint: Gunze Sangyo and Alclad.
Sealing: Johnson's Future.
Airbrush: Aztec A4709
Wash: artist's oil paints thinned with turpentine.
Weathering: none.
Varnish: 50/50 mixture of Tamyia Clear and Matt
Documentation: F-5 Warplane for the World by Robbie Shaw, and the internet.
Steven De Mulder
