Plastic Wings
Hawker Hunter F6
NATO camouflage 7th Wing 8th Sqn Chièvres 1958
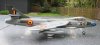
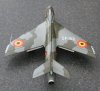
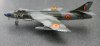
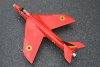
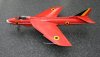
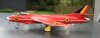
Red Devils demo team 7th Wing 8th Sqn Chièvres 1960
Klik de miniaturen voor een grotere afbeelding.
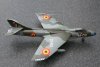
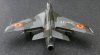
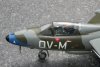
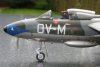
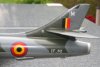
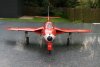
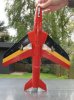
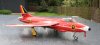
De Hunter in belgische kleuren
Met deze twee Hunters bouwde ik voor het eerst in lange tijd een paar kisten zoals ze een halve eeuw geleden in de BLuM te bewonderen waren.
De ene kocht ik voor zo'n 30.00 bij m'n reguliere modelbouwzaak, de andere kon ik op een beurs voor de helft van de prijs op de kop tikken.
De kit is van Revell en biedt zoals gewoonlijk behoorlijk wat waar voor z'n geld: goed gedetailleerd, fijne ingegraveerde lijnen, nergens flash of sink marks.
Enkel in het inlaatkanaal moesten er een paar ejector marks verwijderd worden.
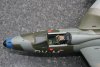
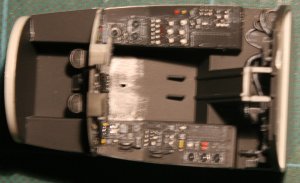
De cockpit zelf is voldoende gedetailleerd, al kunnen de kale zijwanden wel een extraatje verdragen. Gauw wat strip op lengte gesneden en ingekleefd.
Ik had me de moeite kunnen besparen: in het afgewerkte model zie je er zo goed als niets meer van. Zwarte cockpits hé...
The Hunter in belgian colours
With these two hunters I built a pair of planes used in the BAF half a century ago.
One was bought in the local hobby shop setting me back by 30.00. I picked up the other one at an annual modellers fair nearby. At half the price it was a bargain.
It's a Revell kit and as usual it offers good value for money. Well detailled, fine engraved lines, no flash or sink marks.
The only ejector marks I had to deal with were situated in the intake duct.
De cockpit is sufficiently detailled, but the sidewalls could do with a little extra. So I cut some strip to length and glued it in.
I could have spared me the trouble though: they're hardly visible in the finished model. Black cockpits eh...
De cockpit is gespoten in Revell 9 zwart, de instrumenten gedrybrushed met lichtgrijs en zilver. Knoppen en andere details kregen een olieverfkleurtje.
Instrumentglaasjes zijn met Future gesimuleerd.
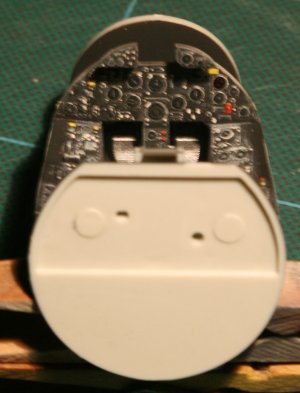
The cocpit was sprayed Revell 9 black, instruments drybrushed lightgrey and silver. Buttons and other details were picked out with artist's oils.
The instruments received a drop of Future to simulate the glasses.
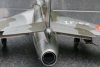
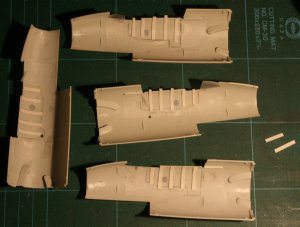
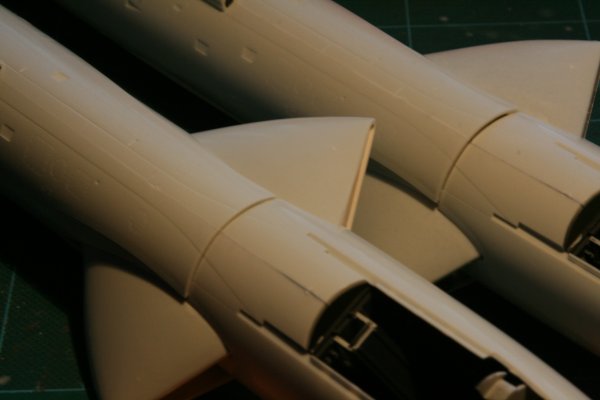
Bij het samenbouwen van de vier rompdelen en het inlaatkanaal is het uitkijken: je kan best afwijken van wat de bouwbeschrijving aanraadt.
Ik volgde die netjes, het resultaat is de slechte aansluiting die je op de foto hieronder ziet.
Je kan best de voorste romphelften samenlijmen, dan de achterste romphelften.
Als de lijm van deze twee subassemblages volledig is uitgehard kan je het luchtinlaat kanaal aan de voorste romphelft lijmen. Eens ook dit stevig is verbonden, dan pas de achterste romp bevestigen.
Het achterste rompdeel omheen de straalpijp stelt een gelijkaardige uitdaging... Alle problemen lieten zich gelukkig wegwerken met heel veel schuren en plamuren gevolgd door herstellen van de paneellijnen.
Gevolg van m'n geklungel was dat ook de vleugels niet netjes meer aansloten op de romp. Nog meer schuren en plamuren dus...
Keep your eyes open when you assemble the four fuselage parts with the intake duct. It's best not to follow the instructions.
I followed them to the letter, and the result was a giant step as seen in the picture below.
In retrospect a better method is to assemble the front fuselage halves, then the rear ones.
Once the glue has cured completely on both subassemblies, glue the inlet duct to the front fuselage. When the glue has cured attach the rear fuselage.
The rearmost fuselage part housing the jetpipe poses a similar challenge... All these problems were solved with lots and lots of sanding and filling followed by rescribing the lost panellines.
As a result of my tinkering the wings als refused to fit smoothly to the fuselage. Yet more sanding and filling...
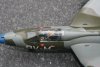
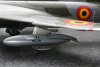
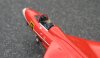
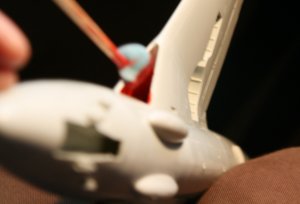
De foto's die ik nam toonden dat de Hunter in Rode Duivel kleuren witte inlaten had, in tegenstelling tot de zilverkleurige van de gecamoufleerde modellen.
Toen de romp goed en wel gemonteerd was kreeg ik informatie dat de luchtinlaten bij de Rode Duivels (hoe kan het ook anders) rood waren. Aargh!
Van herspuiten kon geen sprake zijn: de compressor moest zilver blijven. Na er een nachtje over geslapen te hebben verzon ik een eenvoudige methode
om een rode luchtinlaat te hebben. Kleine stukjes van een afwassponsje op een satéprikker gestoken, in de rode verf gedipt en zo ermee in de inlaat langs de wanden strijken.
Niet de gladste verflaag, maar toch een prima resultaat!
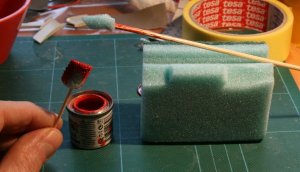
The pictures I took in the Brussels Air Museum showed that Red Devils Hunters had white inlet ducts as opposed to the silver doped ducts in the NATO camouflaged ones.
When the fuselage was well and truly assembled I received information that the intakes on the Red Devils' aircraft were... red, what else? Aargh!
Respraying the intake was out of the question as the compressor face had to remain silver. Having slept a night over it I came up with a simple method
to obtain a red intake. I snipped of small pieces of a dishwashing spunge, stuck it on a meatpin, dipped it in some red paint and coated the inlet walls.
Not the smoothest of finishes but a fine result nevertheless!
De rest van het bouwen verliep zonder enig probleem. Als enig extraatje gebruikte ik de decalsets van Daco. Hoewel zeer goed onderzocht en gedocumenteerd moet het
gezegd dat de nummering van de decals regelmatig niet strookt met wat op het instructieblad staat. Volgens Danny van DaCo is dat omdat de instructies eigenlijk die
van schaal 1/48 zijn... Ook zouden er voldoende stencils zijn om twee modellen te kunnen maken. Dat klopt niet helemaal: ik moest vaak het decalvel in de kit aanspreken.
Het probleem is des te vervelender daar de stencils voor de Rode Duivels grotendeels wit zijn en konden dus niet door die van de kit vervangen worden.
Toch jammer voor een decalvel van 15.00...
Aan de pluskant blijft het een feit dat DaCo decals zeer uitgebreid en zeer goed onderzocht zijn. Goede kwaliteit en perfect in register gedrukt, de kleuren helemaal correct! In totaal zette ik ruim 400 decals op m'n Hunters! O, en Danny: op decal 66 staat er "Avions Fairing" in plaats van "Avions Fairey" - maar je hebt een loupe nodig om het te zien...
Aan de pluskant blijft het een feit dat DaCo decals zeer uitgebreid en zeer goed onderzocht zijn. Goede kwaliteit en perfect in register gedrukt, de kleuren helemaal correct! In totaal zette ik ruim 400 decals op m'n Hunters! O, en Danny: op decal 66 staat er "Avions Fairing" in plaats van "Avions Fairey" - maar je hebt een loupe nodig om het te zien...
The remainder of the build went without a hitch. As sole extra I used DaCo's decal sets. Although very well researched and well documented I must say
that the labeling of the decals on the sheet often doesn't correspond with the instruction sheet. According Danny from DaCo's this is because the instruction sheet is
actually for the 1/48th set... Also there are supposed to be enough stencils provided on the sheet for two kits. That's not entirely true. I often had to resort to the kit's
decal sheet. The problem is even more annoying as the stencils for the Red Devils are mostly white, so any stencils missing on the DaCo sheet couldn't be replaced with the kit's.
Somewhat of a shame for a 15.00 decalsheet.
On the positive side the fact remains that DaCo decals are extensive and very thoroughly researched. Good quality, perfect in register and the colours are spot on! In total I put over 400 decals on my Hunters! By the way Danny, decal 66 says "Avions Fairing" instead of "Avions Fairey" - but then you need a magnifying glass to see it...
On the positive side the fact remains that DaCo decals are extensive and very thoroughly researched. Good quality, perfect in register and the colours are spot on! In total I put over 400 decals on my Hunters! By the way Danny, decal 66 says "Avions Fairing" instead of "Avions Fairey" - but then you need a magnifying glass to see it...
Ik was zuinig met verweren. Enkel een wash om de paneellijnen wat beter te laten uitkomen. De belgische Hunters werden heel netjes gehouden.
Wheatering was kept to a minimum. Just a wash to accentuate the panellines. Belgian hunters were kept in pristine condition.
Data
Kit: Revell 04727Glue: mainly Slater's MEK-Pac and cyano. White glue for the clear parts.
Putty from Tamiya and masking tape from Tesa.
Decals: DACO 3243, DACO 3244 and the kit's
Paint (Red Devils scheme): Enamels Humbrol 174 for the red, a mixture of Revell 12 and Humbrol 154 for the yellow and Revell 6 for the black. Artist's oil paints for the cockpit.
Paint (NATO camo scheme): Enamels Humbrol 136 grey, Humbrol 116 green and Humbrol 11 silverk. Artist's oil paints for the cockpit.
Sealing: Johnson's Future.
Airbrush: Aztec
Wash: artist's oil paints thinned with turpentine.
Varnish: Revell Matt (Nato camo)
Documentation: Hawker Hunter in action by Glenn Ashley, Hawker Hunter in dienst bij de Belgische Luchtmacht by André Van Hautte, the internet and the Brussels Air Museum
Steven De Mulder
