Plastic Wings
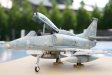
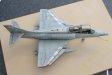
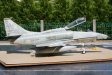
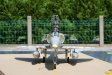
McDonnell Douglas OA-4M Skyhawk
H&MS-12 (WA) Iwakuni, Japan
Klik de miniaturen voor een grotere afbeelding.
De OA-4M werd gebouwd omdat er een behoefte ontstond aan een degelijk TACA (Tactical Air Coordinator, Airborne) platform. Deze toestellen waren verbouwde TA-4F vliegtuigen.
Het type werd gekozen omdat de F in tegenstelling tot de J dezelfde gevechtsmogelijkheden had als de A-4E. Bijkomende avionica zoals TACAN, ECM en andere systemen werden ingebouwd.
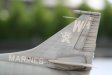
Tussen 1978 en 1980 werden op NARF Pensacola 23 toestellen tot OA-4M geconverteerd. Deze vliegtuigen werden verdeeld over vier eenheden. H&MS-11 met de staartcode TM, was gebaseerd te El Toro, Californië, H&MS-12 (WA) te Iwakuni, Japan, H&MS-13 (YU) te Yuma, Arizona en H&MS-32 (DA) te Cherry Point, North Carolina.
Minstens twee toestellen werden gebruikt door het Naval Air Test Center te Patuxent River in Maryland.
Rond 1991-92 werd de OA-4M uit dienst genomen, en de meeste staan te verkommeren op het vliegtuigkerkhof. Eentje staat op wacht naast de poort te Iwakuni, een ander stortte neer op 15 maart 1986.
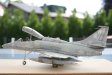
Tijdens het korte bestaan van de OA-4M werden minstens drie, mogelijks vier verschillende camouflagepatronen gebruikt. Drie ervan gebruikten twee of drie tinten grijs, één toestel werd geschilderd zoals de toenmalige Harriers: groen en donkergrijs bovenaan, zilverlichtgrijs onderaan.
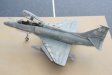
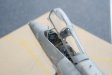
Dit model werd over een periode van vier maanden gebouwd, beginnend in november 2004 en afgewerkt op 13 februari 2005. De kit bevatte een paar nieuwe uitdagingen voor mij: het was de eerste maal dat ik een conversie uitvoerde: de kit bevatte nl. een TA-4J met de nodige onderdelen voor een conversie naar een OA-4M. De neus, tip van de staart en de bult op de rug moesten eraf worden gehaald en vervangen door de conversie-onderdelen.
Het was eveneens mijn eerste poging om de preshading techniek toe te passen, na een lezing hieromtrent in het IPMS Gent. Als extra heb ik de seatbelts torgevoegd, welke ik maakte van de foliedeksels van yoghurtpotjes. Daar de kit een aantal photo-etch onderdelen bevatte - iets waarmee ik tot nog toe nooit mee werkte - schafte ik me een Etch-Mate aan en haalde zo probleemloos goede resultaten van bij de eerste poging.
Het type werd gekozen omdat de F in tegenstelling tot de J dezelfde gevechtsmogelijkheden had als de A-4E. Bijkomende avionica zoals TACAN, ECM en andere systemen werden ingebouwd.
Tussen 1978 en 1980 werden op NARF Pensacola 23 toestellen tot OA-4M geconverteerd. Deze vliegtuigen werden verdeeld over vier eenheden. H&MS-11 met de staartcode TM, was gebaseerd te El Toro, Californië, H&MS-12 (WA) te Iwakuni, Japan, H&MS-13 (YU) te Yuma, Arizona en H&MS-32 (DA) te Cherry Point, North Carolina.
Minstens twee toestellen werden gebruikt door het Naval Air Test Center te Patuxent River in Maryland.
Rond 1991-92 werd de OA-4M uit dienst genomen, en de meeste staan te verkommeren op het vliegtuigkerkhof. Eentje staat op wacht naast de poort te Iwakuni, een ander stortte neer op 15 maart 1986.
Tijdens het korte bestaan van de OA-4M werden minstens drie, mogelijks vier verschillende camouflagepatronen gebruikt. Drie ervan gebruikten twee of drie tinten grijs, één toestel werd geschilderd zoals de toenmalige Harriers: groen en donkergrijs bovenaan, zilverlichtgrijs onderaan.
Dit model werd over een periode van vier maanden gebouwd, beginnend in november 2004 en afgewerkt op 13 februari 2005. De kit bevatte een paar nieuwe uitdagingen voor mij: het was de eerste maal dat ik een conversie uitvoerde: de kit bevatte nl. een TA-4J met de nodige onderdelen voor een conversie naar een OA-4M. De neus, tip van de staart en de bult op de rug moesten eraf worden gehaald en vervangen door de conversie-onderdelen.
Het was eveneens mijn eerste poging om de preshading techniek toe te passen, na een lezing hieromtrent in het IPMS Gent. Als extra heb ik de seatbelts torgevoegd, welke ik maakte van de foliedeksels van yoghurtpotjes. Daar de kit een aantal photo-etch onderdelen bevatte - iets waarmee ik tot nog toe nooit mee werkte - schafte ik me een Etch-Mate aan en haalde zo probleemloos goede resultaten van bij de eerste poging.
The OA-4M was built to fill a need for a decent TACA (Tactical Air Coordina-tor, Airborne) platform. These airplanes were in fact converted from TA-4F.
This type was chosen because as opposed to the J-type, the F-type had the same combat capabilities as the A-E4. Additional avionics such as TACAN, ECM and other systems were added.
Between 1978 and 1980, NARF Pensacola converted 23 airplanes to OA-4M standard. These were then distributed over four units. H&MS-11 wit tailcode TM, was based at El Toro, California, H&MS-12 (WA) at Iwakuni, Japan, H&MS-13 (YU) at Yuma, Arizona and H&MS-32 (DA) at Cherry Point, North Carolina.
At least two machines were used by the Naval Air Test Center at Patuxent River, Maryland.
About 1991-92 the OA-4M was withdrawn from service, and most of them now languish in the bone yard. One is a gate guard at Iwakuni, another crashed on March 15th 1986.
During its brief existence the OA-4M carried at least three, possibly four differ-ent camouflage patterns. Three of them used two or three tones of grey; one machine was painted the same way as the Harriers of that era: green and gray top surfaces, silver at the bottom.
I built this model over a period of four months, staring in November 2004 and finishing the 13th of February 2005. This kit contained some new challenges for me: it was the first time I attempted a conversion. The box contained a TA-4J and the necessary parts to convert it to a OA-4M. The nose, tip of the vertical tail and the hump on the spine had to be removed and replaced by the conversion parts.
It was also my first attempt at preshading, after hearing a lecture on this subject at the IPMS Ghent branch. As an extra I added seatelts made from the lids of yoghurt. As the kit contained some phot etchted parts - something I never had to deal with before - I got myself an Etch-Mate which yielded perfect results from the first try - without any problems!
Data
Kit: Hasegawa CH6, built straight out of the box.Glue: mainly Zap-A-Gap, both super thin and gap filling. White glue for the clear parts.
Putty, polishing compound and masking tape all from Tamiya.
Decals: I couldn't resist Yosemite Sam in the kit's decals...
Paint: Humbrol enamels 125, 128 and 147, Testors ModelMasters metalizers.
Sealing: Johnson's Future.
Airbrush: Badger 150
Wash: artist's oil paints thinned with turpentine.
Weathering: artists chalks and pencils.
Varnish: Revell Matt
Documentation: Aeroguide 14, World Air Power Journal 40, Detail & Scale vol. 32 and the internet.
Steven De Mulder
