|
|
|
|
|
|
|
|
|
|
|
|
|
Historiek (bron: Wikipedia)
De Lightning is een gevechtsvliegtuig dat als onderscheppingsjager gebruikt werd tijdens de jaren 1960 tot in de late jaren 1980.
Het is het enige Mach 2 vliegtuig dat door English Electric in het VK werd ontworpen en gebouwd. Het toestel diende in de RAF, en later ook in de luchtmachten van Kuweit en Saoedi-Arabië. De twee boven elkaar liggende Rolls Royce Avon straalmotoren zijn uniek voor dit vliegtuig. De Lightning werd ontworpen om de russische bommenwerpers te onderscheppen in geval die de Britse vliegvelden van de V-bommenwerpers met kernbommen zouden aanvallen. De Lightning heeft een uitzonderlijk klimvermogen, vliegplafond en snelheid. Dat klimvermogen was dermate fenomenaal dat men zei dat hij klom als een engel met heimwee. Deze prestaties en het aanvankelijk beperkt brandstofvolume gaf de Lightning erg korte beentjes: meer dan opstijgen, een paar rondjes over het vliegveld maken, en terug landen zat er in het begin niet in. Men sprak dan ook van een "puntonderscheppingsjager". De uit de F.1 ontwikkelde modellen kregen steeds grotere brandstoftanks (vergelijk de "buik" van de F.2 en de F.6), zodat het probleem uiteindelijk wel opgelost raakte. |
History (source: Wikipedia)
The English Electric Lightning is a fighter aircraft that served as an interceptor during the 1960s and into the late 1980s.
It remains the only UK-designed and built fighter aircraft capable of Mach 2. It was operated by the Royal Air Force (RAF), the Kuwait Air Force (KAF) and the Royal Saudi Air Force (RSAF). A unique feature of the Lightning's design is the vertical, staggered configuration of its two Rolls-Royce Avon turbojet engines within the fuselage. The Lightning was initially designed and developed as an interceptor to defend the V bomber airfields from attack by anticipated future nuclear-armed supersonic Soviet bombers. The Lightning has exceptional rate of climb, ceiling, and speed. In fact, the rate of climb was so phenomenal that it was said that "it climbs like a homesick angel". This performance and the initially limited fuel supply made the Lightning very short-legged. Take-off, climb to altitude, circle the airfield twice and landing was about the extent of what it could manage. It was duly referred to as a "point interceptor". The later models had increasingly more capacious fuel tanks (compare the "bellies" of the F.2 and the F.6), solving the problem in the end. |
Bouwverslag
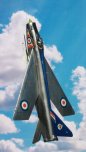
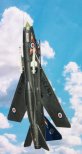
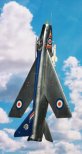
Beide zijn Airfix kits. De F.2 is zoals de meeste van zijn tijdgenoten in "bloot" metaal uitgevoerd, met een blauwe ruggengraat en staartvlak, in de kleuren van het 92e squadron.
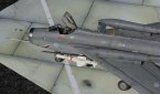
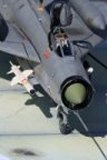
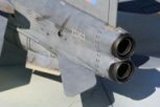
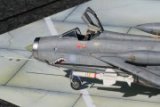
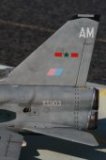
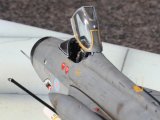
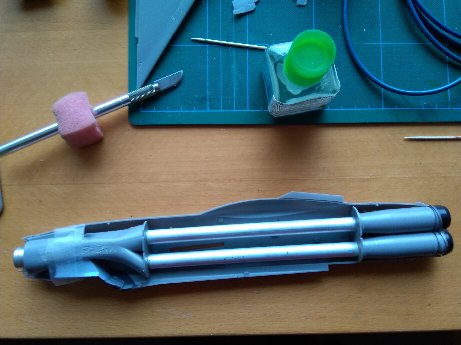
De F.6 is in drie tonen grijs, in de versie van het 5e squadron. Zoals we inmidels van Airfix gewoon zijn, is de pasvorm en de detaillering eerste klas. Al valt er natuurlijk altijd wel iets te grommelen: de schietstoel mocht wat beter uitgewerkt zijn. Als je er de bijgeleverde piloot op zet valt het wel mee, maar voor de "lege" F.6 opteerde ik voor een vervanger van Quickboost. Als je de piloot op de stoel zet, is de cockpit echt te klein. Van de arme sukkel in de F.2 heb ik beide onderbenen en de helft van z'n kont moeten amputeren zodat de canopy nog zou dicht kunnen. Ook het instrumentenbord moest een stukje kleiner worden gemaakt. De chroomkleurige neusring is een maatje te groot. Ik heb beide verticaal doorgezaagd zodat er boven en onder ruim een mm afging, en de helften terug aaneengelijmd. Het wegwerken van die naden was een geduldwerkje, maar essentieel gezien hun chroomafwerking. Het lijkt me ook dat die ring wat te cilindrisch is in vergelijking met het echte artikel dat wat taps is naar de voorkant toe. Verder alleen maar lof voor deze kit. Omdat ik de F.2 als een echte "homesick angel" wou presenteren, heb ik die met twee acrylstaven in een blokje hout gemonteerd. In de romp zitten tussen de inlaat en de uitlaat twee aluminium buizen gelijmd waar die acrylstaven in glijden. |
Building the kits
Both kits are from Airfix. Like many of its contempories it has a bare metal livery, with a blue spine and vertical tail and finished in the markings of 92 Sqn.
The F.6 received a three tone grey camo, sporting the markings of 5 Sqn. As usual with Airfix, fit and detailing are first class. Yet there is always something to nag about. For one, the bang seat might have been a bit richer in detail. It's passable when you add the pilot figure, but for my "empty" F.6 I opted for a Quickboost replacement. With the pilot in the ejection seat the cockpit really is too small. I had to amputate both lower legs and half the poor sod's bum in order to be able to close the canopy. I also had to trim the underside from the dashboard. As the chrome-coloured nose ring is a size too big, I sawed them both in half vertically, removing about one mm from the upper and lower cut before glueing the halves back together again. Getting rid of the seams took time but was essential in view of their chrome finish. I also feel that the ring is more cylindrical than the real thing, which tapers somewhat towards the front. Apart from that I can only admire the quality of the kits. Because I wanted to present the F.2 as a genuine "homesick angel" I mounted it on a small block of wood, by means of two acrylic rods. Inside the fuselage are two aluminium tubes, glued between the intake and the exhaust. |
 |
|
|
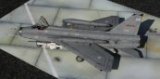
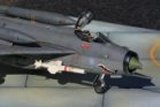
De F.6 staat met z'n voetjes op de grond, en kreeg een neus vol lood zodat hij niet op zijn staart zou gaan zitten.
Zowel in als achter de radarneus zit het helemaal vol bolletjes lood die met siliconen vastgelijmd zijn. En dat is juist gepast genoeg om zijn neuswiel op de grond te houden!
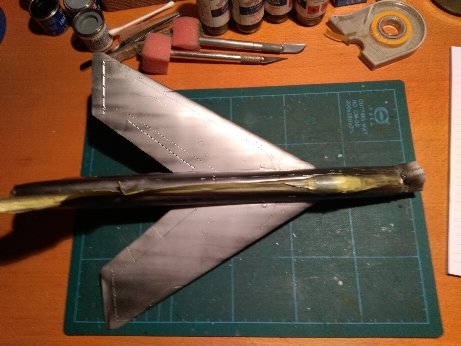
De lange rompnaden lijm je best een paar cm per keer, zodat alles mooi uitgelijnd kan worden en er niet nodeloos moet geschraapt en geschuurd worden - wat al dat mooie detail zou vernielen. De kit liet zich erg vlot in mekaar steken, pasproblemen heb ik op die neusring na niet gehad. Wel opletten bij de vleugeltanks van de F.6. Er is een linker- en een rechtertank, maar de helften zijn verkeerd genummerd. Dat is natuurlijk maar aan het licht gekomen op het allerlaatste, toen ik ze wou monteren op de vleugels. Paspinnentjes er afgesneden, gaatjes geboord, en pinnetjes gemaakt van 1mm messingstaaf om die kemel recht te trekken... Het schilderwerk van de F.2 was een nachtmerrie. Omdat het een metaalafwerking werd, moesten krasjes en imperfecties weggehaald worden. Dat werd dus natschuren met 400, 600, 1000, 1200, 2000, 4000, 8000, 10.000 en 12.000 korrel... Dan een zwarte primer van Alclad er op. Dan de blauwe rug en staart. En toen ging het mis. Een dag later was dat blauw gecraqueleerd en leek het qua textuur wel vergruisd marmer. Terug schuren (alle korrels!). Paneellijnen hergraveren, nog eens schuren en opnieuw primer, een dag later gevolgd door Humbrol 25 blauw. De dag erna had ik een verse lading marmer. Grrr! Weer schuren, graveren, schuren. Deze keer geen primer van Alclad, maar gewoon zwarte humbrol, en daar dan blauw op. Ditmaal geen verassingen meer. Na twee dagen een laag of drie Future op dat blauw, ter bescherming. Na een tweetal dagen droogtijd alle blauw met Tamiya tape afgeplakt, en een paar geselecteerde panelen in titanium en staal gespoten. Future er op, laten drogen, afplakken. De rest van het vliegtuig in Alclad aluminium gespoten. Vlekken. Poedersuiker. Hetzelfde verhaal als bij mijn Mitsubishi F-1 en T-2. Schuren, graveren, schuren, primen. Opnieuw Alclad spuiten. Vlekken en strepen... De derde keer waren romp en de onderkant van de vleugels goed, maar de bovenkant van de vleugels had nog steeds strepen. Dezelfde verf, dezelfde airbrush, dezelfde druk, dezelfde spuitafstand, hetzelfde ventje dat de airbrush vasthoudt, dezelfde spuitsessie... Niet te begrijpen. Intussen hoorde ik dat Alclad maar zo'n 2-3 jaar houdbaar is. Mijn flesjes zijn minstens zes jaar oud. Is dat het probleem? Later heeft de vernis op de blauwe verf ook nog eens losgelaten. Als ik minder punten krijg voor het resultaat, dan krijg ik er vast meer voor vasthoudendheid. |
The F.6 has his feet on the ground, and to avoid it becomming a tail sitter I filled the radome and the space behind it with leadshot, glued in place with silicone.
It's just about enough to keep its nosewheel on the ground - but only just!
It's best to glue the long fuselage halves a few cm at the time so everything can be lined up nicely. This way you can keep scraping and sanding to an absolute minimum and you won't destroy all that nice detail. The kit went together very well and apart from the nose ring I encountered no fit problems. Keep your eyes open when assembling the overwing tanks though. There is a left hand and a right hand tank, but the numbering of the halves is wrong. It was not before the very end of the build that this problem surfaced. I cut off the locating pins, drilled holes and made new pins from 1 mm brass rod, thus rectifying the cock-up. Painting the F.2 was a nightmare. Because it was to receive a metal finish, all scratches and imperfections had to be removed. That meant wet sanding with 400, 600, 1000, 1200, 2000, 4000, 8000, 10.000 and 12.000 grit... After that I sprayed black Alclad primer on. Then the blue spine and rudder. And then things went haywire. A day later the blue had cracked and had the texture of crushed marble. Back to sanding (all the grits!), engraving the damaged panel lines, sanding and a new coat of primer. Followed a day later by a fresh coat of Humbrol no 25 Blue. The day after I had a fresh load of marble. Raaah! More sanding, engraving, sanding. No Alclad primer this time, but plain black Humbrol, and blue over that. No more surprises this time. After a day or two I sprayed three layers of Future over the blue, to protect it. Allowing two days drying time I taped off the blue surfaces with Tamiya masking tape, then sprayed Alclad titanium and steel on a few selected panels. Covered them with Future, let it dry, mask off. Spray the rest of the airplane with Alclad aluminium. Spots. Powdered sugar. The same thing as with my Mitsubishi F-1 and T-2. Sand, engrave, sand, prime. Another try with the Alclad. Spots and stripes... The third time around I had good results on the fuselage and on the underside of the wings. The upper sides still showed stripes. Same paint, same airbrush, same air pressure, same spraying distance, same guy holding the airbrush, same paint session... Go figure. I since heard that Alclad has a shelf life of about 2-3 years. My paint bottles are at least six years old. Dunno if that's the problem... Later on the varnish on the blue tail also lifted. If I get less points for the result, surely I'll get some extra for tenacity. |
 |
|
|
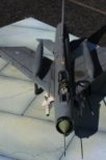
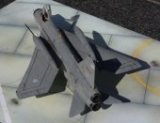
Het schilderen van de F.6 bracht tot mijn plezier geen problemen met zich mee. Ik probeerde een nieuwe techniek uit, black basing.
In plaats van eerst de paneellijnen zwart te spuiten, spoot ik het hele model zwart. Vervolgens spoot ik met een fijne naald de grijzen in een spaghetti wirwar van lijntjes tot het zo goed als volledig gedekt was. Daarover met een brede spuitkop nog een laagje van dezelfde kleur, dit keer sterk verdund zodat alles mooi in mekaar vloeit. Het resultaat staat me erg aan. Na een paar dagen drogen gingen er drie lagen Future op, dan de decals, en terug een paar lagen Future. Wheateren met olieverf en terpentijn. Een week laten drogen op de radiator. Matte vernis. Pastelkrijtstof om olie, brandstof en vuil te simuleren. Terug vernis. Hier en daar wat chipping rond een paar panelen aanbrengen met de zilverstift. Alle resterende kleine onderdelen, landingsgestel, canopies, pitotbuis, bijtankbuis, wapens en droptanks toevoegen. Klaar. Ah, juist: die wapenpylons wouden niet blijven zitten, dus heb ik daar ook messingpinnetjes voor gemaakt. De gele zweep-antennetjes op de rug maakte ik van haartjes uit een tandenborstel. Dat is flexibel en breekt niet af zoals gerokken sprue. |
The paintjob on the F.6 caused no troubles I'm happy to say. I tried the black basing method, which was new to me.
Instead of first accentuating the panel lines with black paint, I painted the whole model black. Then, using a fine needle I sprayed the greys making lots of squigly lines until the model was covered in them. Over that, using a wide nozzle I added a final layer of the same colour, heavily diluted this time. This makes it all come together nicely. I'm chuffed with the result. After a few days drying time I misted on another three coats of Future, added the decals and sealed them with more coats of Future. Weathering was done with a wash of oil paint and turpentine. Let it dry on the radiator for about a week. Matt varnish. Pastel powder to simulate oil and fuel stains and streaks and dirt. Another coat of varnish. With a silver pencil add some chipping around a few selected panels. Add the remaining fiddly bits, landing gear, canopies, pitot tube, refueling probe, weapons and droptanks. Finished. Ah, right: the weapon pylons wouldn't stay put, so I used more brass rod to make the mounting pins needed. I made the yellow whip antennae on the spine from the bristles from a disused toothbrush. They are flexible and won't break like stretched sprue ones. |
|
Gegevens: Lengte: 16.9 m Hoogte: 5.9 m Spanwijdte: 10.7 m Max. startgewicht: 18.900 kg Max snelheid: 2.415 km/h op 9.000m Actieradius: 1300 km Plafond: 20.000 m |
Data: Length: 16.9 m Height: 5.9 m Span: 10.7 m Max. take-off weight: 18.900 kg Max speed: 2.415 km/h at 9.000 m Range: 1300 km Ceiling: 20.000 m |
